Video Tutorials
 Getting Started
-
 Plugins Installation
- Pre-Built Demos
 Header
 Footer
 Widgets / Sidebars
 Menu
Menu
- Theme Settings
- Custom Post Types
 Pages
Pages
 Saasland Elements
 Forms (Job Apply, Contact)
 WooCommerce
 One page
 FAQs
FAQs
 Elementor
- Elementor Widgets
- Dark Mode Settings
- Quick Links
 Tips / Guides / Troubleshoots
 Theme Updates
 Change Logs
- Home
- Docs
- Saasland Documentation
- WooCommerce
WooCommerce
Estimated reading : 7 minute
How to use WooCommerce with Saasland (products, settings)?
WooCommerce configuration is essential if you want to create an online shopping experience for your customers. With the help of this tool, you can create online shops easily. In the following, we will look into how you can configure the basic settings of WooCommerce.
Configuring WooCommerce for Saasland
- To configure the WooCommerce settings for Saasland, go to WooCommerce > Settings from the WordPress dashboard menu.
- From the settings option, you can add information in the Store Address section.

- There you can add information related to your address line, city, country, postcode and more.
- You can also add information such as selling and shipping locations from this option.
- In addition to that, the general option will also allow you to add information such as default customer locations, and give you the choice to enable or disable taxes and coupons on your shop.
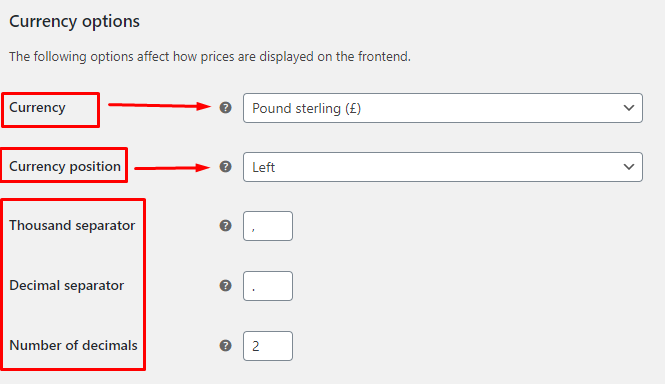
- Plus, from the currency option you can select the type of currency you want to add in your website, the position of the currency and few display settings such as thousand separator, decimal separator, number of decimals.
Once you have added the information, the basic information about your store will be updated.
Navigate through the different options to configure the basic settings. After completing the general settings, let’s have a look at the Product Settings.
Product Settings

- Shop Page: From here you can select at which shop page the product will be added. It is a mandatory setting, otherwise the product will not be visible in the shop page.
- Add to cart behaviour: From this option you can select whether you want to redirect to the cart or enable AJAX add to cart button on archives.
- Placeholder Image: You can select the number of placeholder images you want to add in each product.
- Weight Unit: Select whether you want the weight unit to be kg, g, lbs or oz.
- Dimensions Unit: You can also select the dimensions unit from m, mm, cm, inch and yd.
Shipping
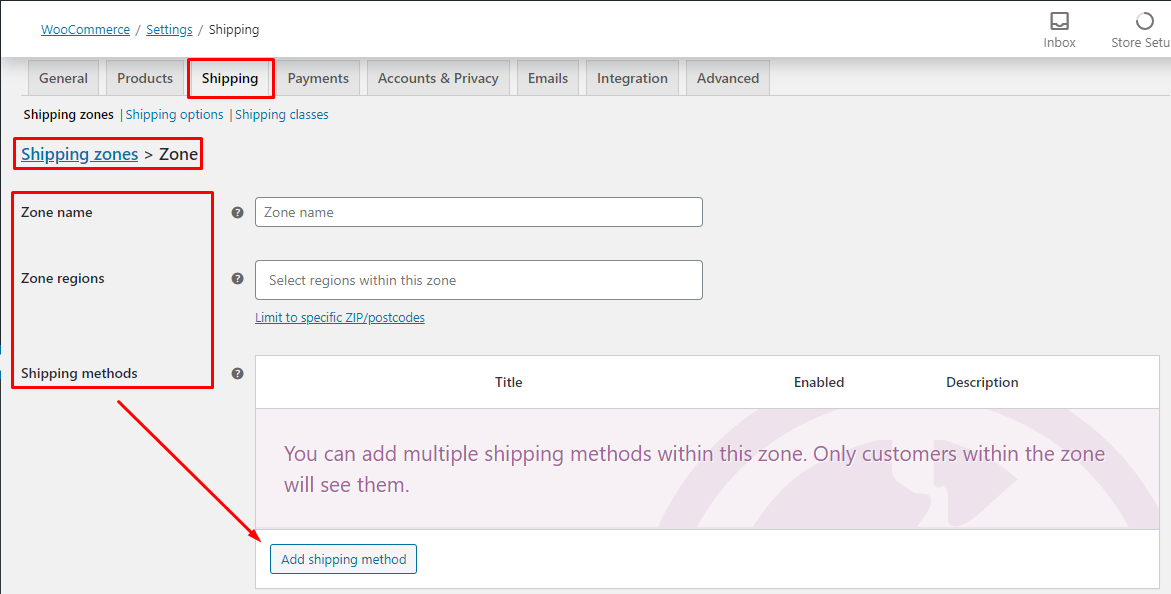
From the shipping option, you can customize the following settings.
- Zone name: You can give names to the different zones to identify them uniquely.
- Zone regions: Select from the long list of zone regions. You can search by country or region to get quicker access.
- Shipping methods: You can choose from three different shipping methods. Flat rate, free shipping and local pickup. You can have a unique shipping method based on the zone.
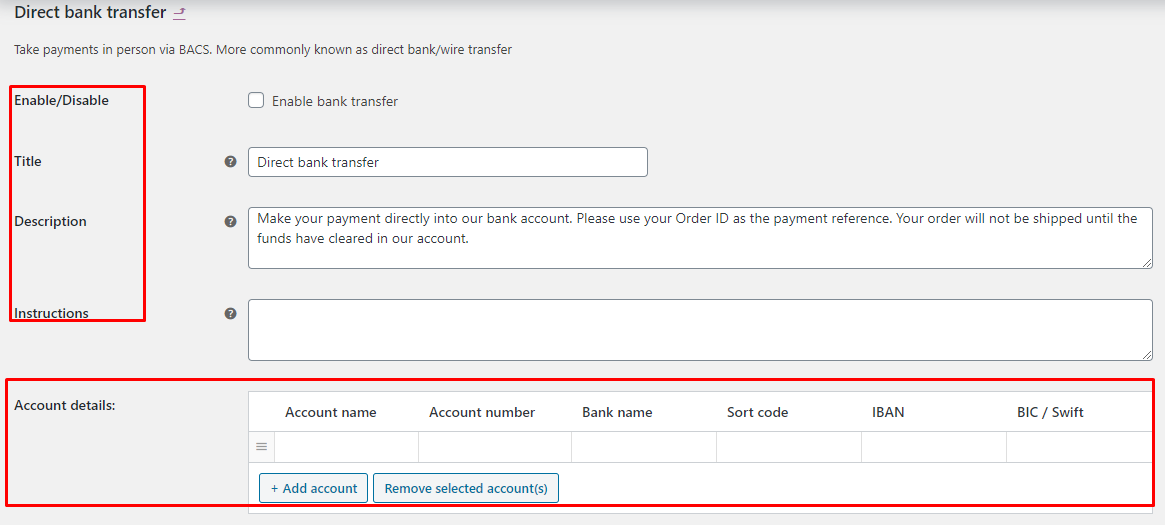
Payments
In the payments tab you can change the following payments settings.

- You can enable/disable the available payment options from the given list.
- If you want to set up any individual method, click on the set up button
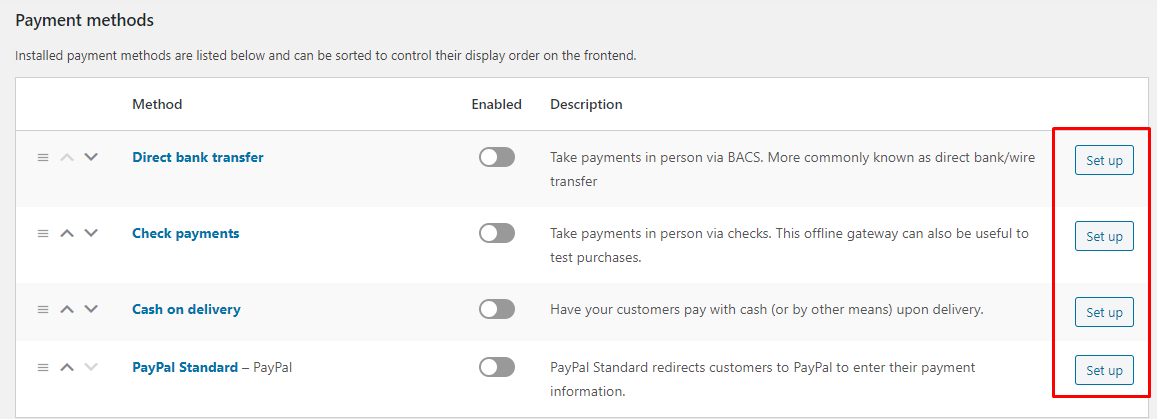
- It will take you to a new page from where you can input the required details to set up the payment option easily. Put the necessary account details based on the payment method and complete the set up.
Accounts & Privacy
From the account & privacy option, you can set up the following basic settings.
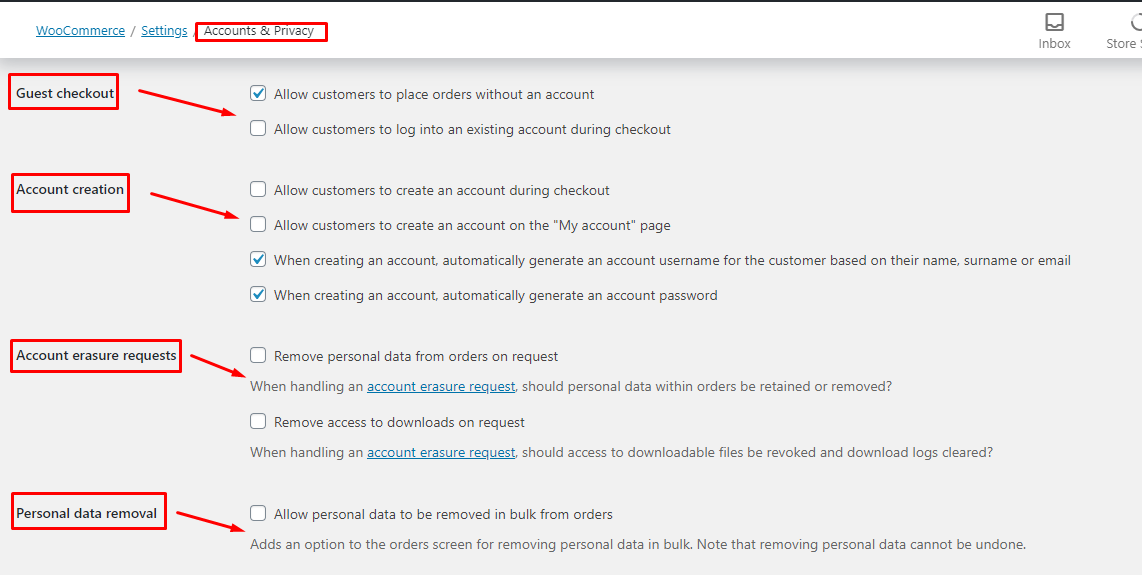
- In this section you can also add contents related to registration privacy policy and checkout privacy policy. We encourage adding privacy policies for a trusted user experience.

- You can also configure how long the different types of personal data will be retained by the system. There are different categories of options to choose from.

From the email section, you can manage who will be the recipient of the different actions on your shop. For example, who will get the email when a new order is placed, when order is completed or on hold. There are many options that you can navigate through.

Integration
This integration feature allows you to integrate with the Maxmind feature. This is important if you want to enable the Geolocation feature on your website. You can check the following details for specifications.
Advanced
- From the advanced option, you can change the settings of page setup, checkout endpoints and account endpoints.
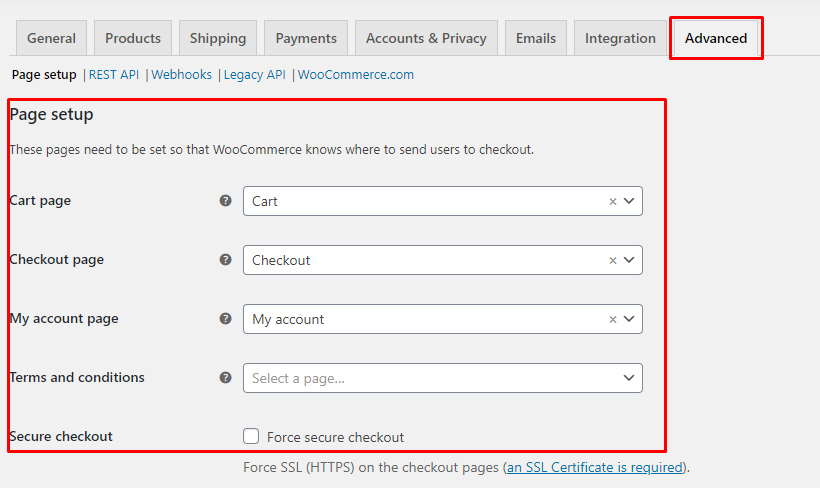


- You can easily change the functionalities mentioned above and modify it as per your requirement.
- Saasland WooCommerce Action
Adding Product
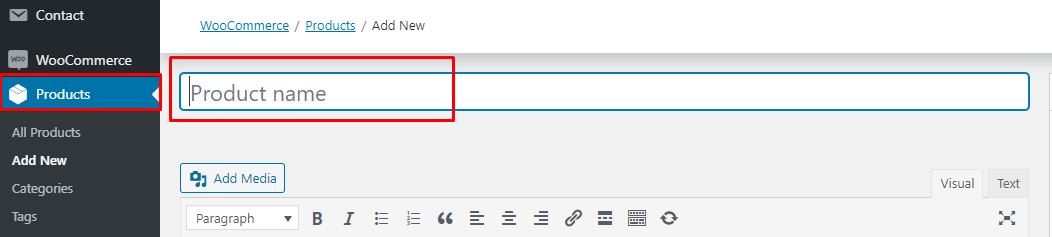
To add new products on your shop, you will have to do the following:
- Navigate to Products > Add New from the WordPress dashboard menu.
- In Product Name section, add the name of the product you want to display on your shop
- Scroll down to Products Option and you will have the following options, under the Banner option.

- Title: This option allows you to add product titles. If you already added a product name, then there is no need to change anything here.
- Subtitle: In the subtitle section, you can put the description of the product. However, we recommend using the short description option that we will discuss in the following. We recommend it because it gives you more functionality to explore.
- Banner: From this option, you can choose to show or hide the banner while this product is displayed.
- Shape Image: You can add shape images to display the product creatively.
- Text Color: The text color will allow you to change colors as per your requirement.
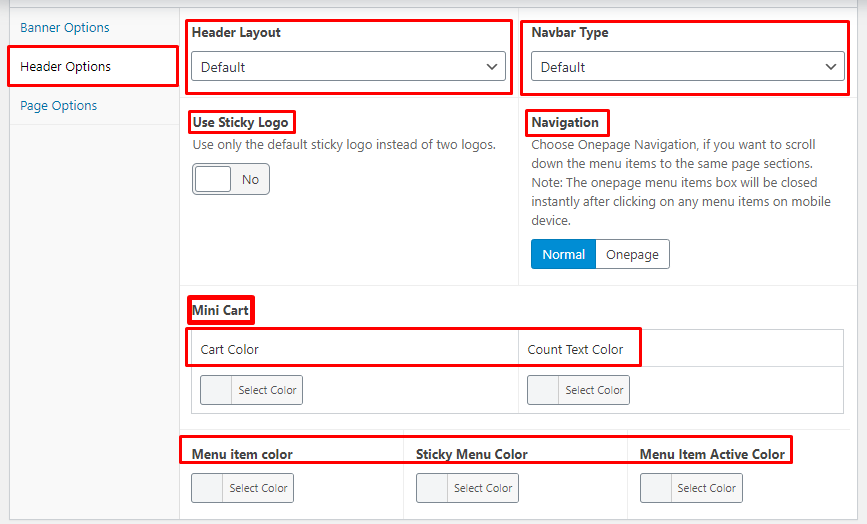
From the Header Options, you can customize the following options.
- Header Layout: You can pick from the available three layouts to display the header.
- Navbar Type: You can select how you want your navbar to be displayed. There are two options to pick from.
- Sticky Logo: Enable or disable sticky logo on your header
- Navigation: You pick between two navigation options. There is a normal navigation option and one page navigation option. You can pick the one you want to have on your website.
- You can also change colors of mini cart, count text color, menu item color, sticky menu color, menu item active color.
The Page Options will allow you to add padding and background color to the page.
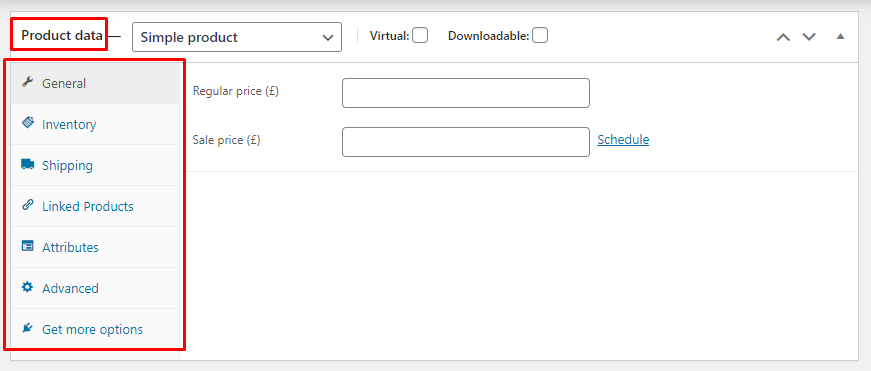
Scroll down to find the Product Data option. From here you can add additional information about the product which might be necessary for the buyers. List of information you can add under all these options.
- General: Add Regular price or Sale price to your product.
- Inventory: You can include if you want to include the specific product under any SKU. WooCommerce also gives you the option to manage stock at the product level. You can input stock quantity, allow backorders, low stock threshold to the product information as well.
- Shipping: In this option, you can add weight, dimension and shipping class of your product. This information might be mandatory for specific product items.
- Linked Products: By using the linked products option, you can add products that you want to upsell or cross sell. You can type in the name of the products you already added to display. By doing this you’re also showcasing another already listed product.
- Attributes: Custom product attributes such as available colors and available sizes can be added from this option.
- Advanced: The advanced section will allow you to include a purchase note, select menu order and enable/disable review option for the product.
- From the product short description option, you can add texts and other mediums to communicate about the product. We recommend mentioning key points and features of the product in this section so that the users have an idea about the product.

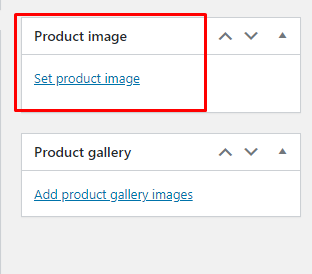
- To add pictures to your product, navigate to the right hand side of the page and use the product image option to add the necessary picture. Select a good quality picture to ensure it creates a good impression on the mind of the user.
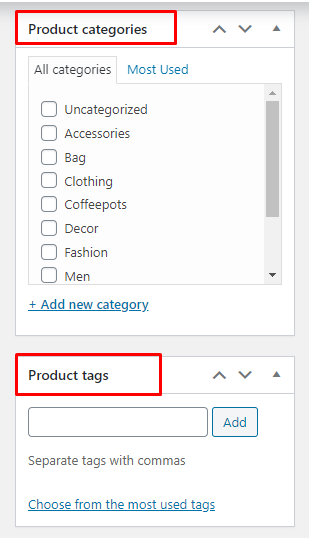
- If you have different categories of products, you can categorize them from the product categories option. You can also tag the product from the product tags option.
After completing the process, you will be able to add a new product to your shop. You can edit the products by navigating to Products > All Products > Select product > Edit option from the WordPress dashboard.